
Search Console for Beginners: Your First 8 Steps After Adding a Site
Search Console is the official dialogue panel between your site and Google — completely free, and telling you things no other tool can: whether your pages are actually indexed, which queries your pages appear for, and which errors block indexing. Many new site owners ignore it because the interface looks complicated, then wonder why their site never shows in search — even though they never told Google it exists. In this article I arrange your first eight practical steps after adding a site, in the same order I follow when connecting any new site, from direct experience managing real accounts.
What you will actually do after reading this article:
- Connect your site and verify ownership in a way that lasts
- Submit your sitemap and monitor crawler access to your pages
- Inspect any URL and understand what the result truly means
- Read the performance report and extract keyword opportunities from it
Why You Need the Console From Day One
Google eventually discovers new sites even without help, but passive waiting can take weeks you cannot afford, while a sitemap submitted through the Console shortens the road to days. The difference is not a technical secret but a plain time difference showing in your first visits — every week of delayed indexing is a week cut from your article's life in search results. Anyone working with content knows an article's age in search is its real capital.
More important than speed itself, the Console gives you an honesty rare in the SEO world: the indexing report tells you exactly which pages Google indexed, which it excluded, and why — instead of the endless guessing loop of "is my site indexed or not?" This honesty grounds every later decision, because once you know your indexing's actual state you know where to spend time: fixing excluded pages, or creating new content, not in the illusion that everything works under the surface.
Step One: Add the Site as a Domain Property
Open Search Console, click add property, and you will see two options: a domain property covering the entire domain with all its versions and subdomains, or a URL-prefix property covering only a specific path. Choose the domain property if you have DNS access — it is the more complete one, protecting you from partial coverage that hides parts of your site from your reports. A small site can work with prefix properties, but full-domain coverage saves you a future problem at no extra cost.
Verifying a domain property uses a text record added to your DNS settings at your registrar: copy the value Google gives you, paste it into a TXT record, and wait from minutes to hours for propagation. Do not worry if verification fails the first time — propagation speed differs between registrars, and pressing verify again after a short wait usually works. It is one step lasting the domain's lifetime, never repeated no matter how the site changes.
Step Two: Submit Your Sitemap
A sitemap is a file listing your important pages in one place, and modern sites generate it automatically at sitemap.xml on the root. Open the URL in your browser to confirm it works and lists your pages, then go to the sitemaps section in the side menu and submit it. Within days Google starts using the map as a primary discovery guide for new pages, and the map's own report tells you how many pages were discovered.
Know what the map does not do: it is a suggestion list, not an indexing command — Google may discover pages from other links and refuse some map pages for quality reasons. Include only pages you genuinely want indexed, and exclude empty tag pages, internal search results, and duplicates. A clean map of good pages beats an inflated one of anything — quality over quantity here too.
Step Three: Inspect Your Important URLs Manually
Take your five most important pages and inspect them one by one with the URL inspection tool at the top of the Console. The tool tells you whether the URL is indexed on Google, and if not, the stated reason: recent discovery, a noindex directive, or exclusion for quality or duplication. This is the only honest snapshot of your page's state from inside Google, and the fastest way to catch a problem before it accumulates for a whole month unnoticed.
If an important page is not yet indexed, use the request-indexing option inside the same tool after confirming the page is actually healthy. Do not overdo requests or repeat them hourly — there is a reasonable daily limit and volume does not speed anything. The correct routine after publishing a new article: inspect the URL, and if it shows not indexed due to recent discovery, request indexing once and let Google quietly finish its work.
Step Four: Read the Indexing Report Weekly
The pages report shows the state of every discovered page in three main groups: indexed, indexed with alternate, and not indexed — with reasons split into categories like excluded by directive, recently discovered, or duplicate content. Make opening this report a ten-minute weekly habit, and watch the categories growing over time, because they are your early signals of problems before you lose whole pages from search. An honest report prevents late, expensive discovery.
Watch specifically for "alternate page with proper canonical tag" — the most misunderstood one: a canonical pointing elsewhere is sometimes intentional and fine, but it happens by mistake too, through a template or plugin setting, pulling real pages out of indexing. Review line by line if this group suddenly grows, and remember every important page should be its own self-reference for indexing, not an alternate of an unrelated page.
Step Five: Connect the Site With robots.txt
The robots.txt file at your site root tells crawlers which sections are allowed and blocked, and the Console displays your current version pointing out syntax errors if any exist. Quick check: open your domain followed by robots.txt and confirm it allows general crawling and does not accidentally block content directories — a protection meant for staging environments sometimes forgotten on production. One wrong line here can block your entire site's crawling while everything else looks fine.
Remember that robots blocks crawling, not indexing itself: a page blocked from crawling may still appear in results if external links point to it, and true indexing prevention happens via a noindex tag on the page itself. This precise distinction saves you hours of confusion later — know which tool serves which goal: robots for crawl management, noindex for indexing management, never mixing the two.
Step Six: Follow the Performance Report and Extract Keywords
The performance report shows the queries your pages appeared for in search results, with impressions, clicks, and average position, with data going back sixteen months. From it you extract three kinds of information: which of your pages actually rank, which sit on the edge of page one at positions eleven to twenty, and which queries your site shows for without explicitly targeting. The last group is the report's most precious part — real audience demand you were already answering without knowing.
Open a weekly extraction session: find pages with many impressions and few clicks — a sign the title or description does not convince despite decent ranking. Improve the title and description, wait two weeks, then measure the change. Repeat on queries near page one, strengthening them with a supporting article linking to them, and their positions improve at far lower cost than building pages from scratch.
Step Seven: Test Mobile on Your Actual Phone
The site indexes on the mobile version first, so test your pages' experience on your real device, not the desktop emulator. The Console's mobile-friendliness test reports technical errors, but it cannot give you the visitor's real feeling: is your text readable without zooming, are buttons within thumb reach, does the page open in seconds on mobile data. The final judgment belongs to the mix of both tools — technical and experiential — because each sees what the other misses.
When a problem appears on mobile only, first distinguish display from performance: crowded buttons and cut text are template problems fixed by better styling, while slow loading on data connections is a weight problem needing image and font compression. Do not try to solve both with one fix — each has a completely different treatment path, and I covered the performance side in detail in the Core Web Vitals article dedicated to exactly this.
Step Eight: Receive Google Alerts on Your Email
Enable receiving Console messages on your primary email — Google sends alerts when it discovers significant indexing problems, security warnings, or manual actions if they occur. One early message can save you a week of traffic decline with no obvious cause, especially for problems visible only in internal reports. Activation is a single setting in the Console's corner, and few messages on a healthy site are part of the benefit — do not confuse message volume with monitoring quality.
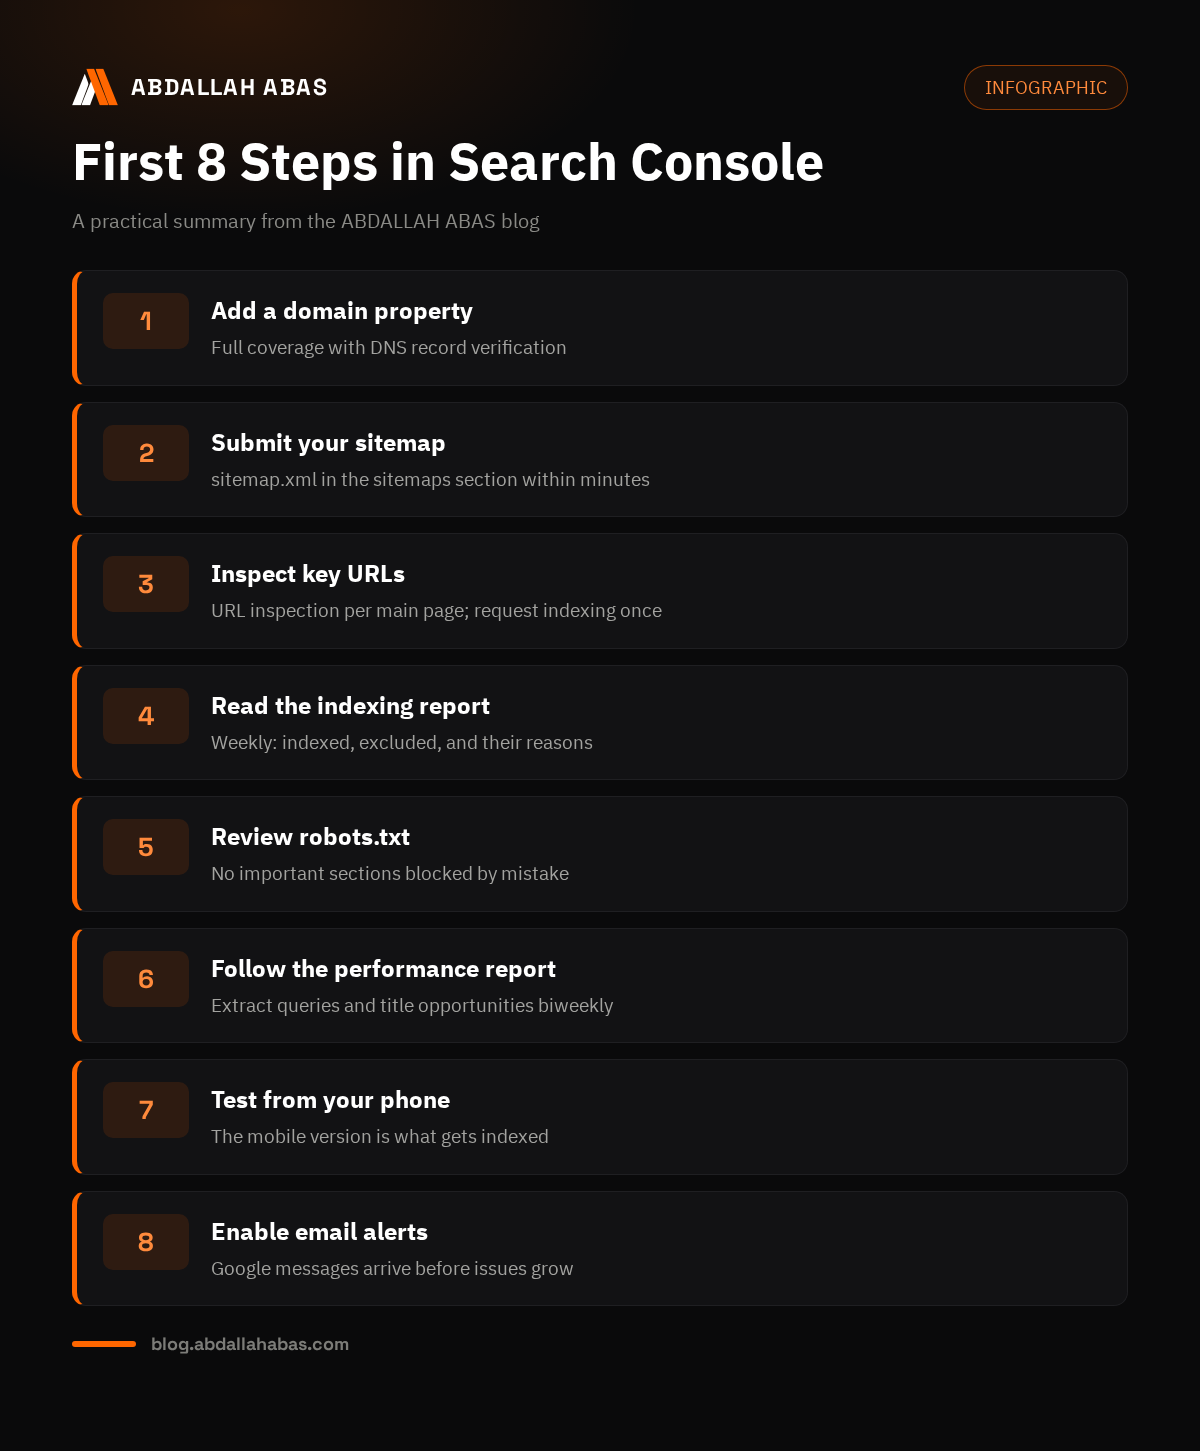
With these eight steps your site is monitored from indexing to performance, and the rest is habit, not setup. Review the indexing report weekly, the performance report every two weeks, and inspect every new link you publish. With this minimal consistency the Console turns from an ignored panel into your primary work tool — which is exactly what anyone managing a site professionally does, quietly and without noise.
Common Beginner Mistakes
The most common mistake I see is submitting the site then closing the Console for weeks, then wondering about missing results. The second is random daily indexing requests for every page, believing volume speeds indexing — the truth is excessive requests gain no priority and only waste your time. The third is reading the performance report as meaningless numbers instead of business opportunities: every row there is either an improvement opportunity or a success worth consolidating and expanding.
The most dangerous mistake of all is using a noindex tag during site experiments then forgetting it on production — this hides your whole site from search while everything else looks healthy. Review this tag first whenever your indexing suddenly collapses without apparent cause, and keep a quick-check routine after every migration or major site update. Prevention here is months faster than cure, and most of us learn it after the loss, not before.
The Links Report: Who Points to You and Where You Point
The links report shows pages across the web pointing to your site — an honest mirror of your external reputation visible nowhere else. Review the referring sites list periodically and confirm links come from reasonable sites, not strange spam networks; sudden suspicious quantities deserve attention. You do not need to panic over every weak link — Google ignores most of them automatically — but monitoring gives you an honest picture of your presence's growth.
Outbound links from your site also carry a quality dimension that matters: link only to sources genuinely useful to your reader, and never link to low-value sites against vague link-exchange promises. Every outbound link is a recommendation you make in front of your visitor, and a site that links with conscience keeps its audience's trust and search engines' trust together. This simple rule protects you from common mistakes made by those hearing about link exchanges for the first time.
Security Alerts and Manual Actions
The manual actions section is among the Console's most serious and quietest sections on healthy sites — it is where Google's manual penalties appear if they occur. A small clean site rarely sees anything here, which itself is the result of clean behavior in content and links. If a manual action message ever appears, read its specific cause carefully, fix precisely what it indicates, then submit a reconsideration request from the same section — that path is the only road back, not side methods.
The security issues section tells you about hacking or malware alerts before visitors see them — a hacked site shows visitors a red browser warning that kills visits even after fixing. The earlier you learn of the problem the cheaper the fix, which is why I advised enabling email alerts earlier: they turn these sections from a silent monitor into a guard that screams at danger.
A Full Monthly Routine With the Console
Give every month a simple fixed routine not exceeding thirty minutes: review the indexing report and track the indexed-pages trend, inspect the latest five links you published, read the performance report and extract two improvement opportunities, then confirm no new messages or warnings exist. This routine is the minimum separating a monitored site from one left in the wilderness of the internet with no eyes on it.
If you want to expand your routine with free tools supporting the Console, my review of free tools for creators gathers what I actually use in daily work without paid tools. As for organizing content and review time together, I explained it in the monthly content plan, putting your SEO decisions on a fixed schedule rather than the mood of the moment.
The Console Versus Third-Party Tools
You will receive endless offers from paid analytics tools promising wider numbers than the Console, and honestly these tools mostly estimate while the Console knows. Visit numbers in any external tool are approximate, built on samples and open data, while the Console's performance report comes directly from search results themselves. So make it the judge in every dispute between numbers, and use external tools for what lies beyond its scope: competitor analysis, tracking queries not yet ranking, and social spread tracking.
This distinction saves you early subscriptions you do not need in your current stage. A small site passes its first full year with the Console alone plus a free analytics tool, and when the site grows the need for advanced tools comes naturally from inside the work, not from tutorial advertising. Do not buy the early-decision trap — tools do not create content, and the desire for tools is often technical-looking procrastination of writing itself.
Questions New Users Ask
How long until my site appears in search results?
Initial indexing after submitting the sitemap takes days, while actual appearance in competitive results takes weeks to months depending on competition and content quality. Do not measure success by the first week but by the impressions curve trend in the performance report. A small site with good content starts appearing on long-tail queries first, then expands gradually as trust completes.
Do I need the Console if my site is on a ready platform?
Yes — platforms ease connecting but never replace your personal monitoring. Some platforms submit sitemaps automatically and show simplified summaries, but manual inspection and the full performance report exist only in the Console itself. Think of it as full control over your indexing, not an optional extra: the platform manages the infrastructure, you manage search presence.
Should I resubmit the sitemap after every new article?
No need — the map updates automatically with every publish on healthy sites, and Google rereads it at a rate sufficient for discovery. What you should do after publishing an important article is inspect its URL and request indexing once if it shows unindexed — faster and more precise than resubmitting the whole map. The map is the standing discovery base; manual inspection is the acceleration path for important items.
Does the Console directly affect ranking?
The Console does not raise your ranking by existing — it gives you visibility enabling decisions that do. Choosing to improve a page on the edge of page one, fixing excluded pages, or strengthening internal links between articles — these decisions all come from reading its reports correctly. The tool is a measure and an eye; decision and execution remain yours alone, which is precisely its real value.
What if Google refuses to index an important page?
Open the inspection tool and read the stated exclusion reason before any action — each reason has a different treatment: if recent discovery, wait days and request once; if quality or duplication, review the page against strict standards and improve before re-requesting. Never spam repeated requests however anxious you feel — insistence does not change page quality, and honestly treating the cause changes the outcome in the vast majority of cases.
Do Console errors block my site from search?
Most of what you see in reports are warnings and information, not indexing-blocking errors — do not fear them before reading the attached description. Genuinely serious warnings are rare on small clean sites, arriving as clear messages about security issues or explicit violations. Review the warning calmly, understand its cause from the official documentation linked to it, then fix and request re-review — this path suffices in the vast majority of cases.
Conclusion: A Dashboard, Not an Extra Tool
Search Console is not an optional accessory for SEO hobbyists but the dashboard of every site wanting real search presence: it tells you that you are indexed, shows you what your visitors search for, and alerts you to problems before they turn into costly losses. Fix the eight steps as a clear routine, follow the reports weekly, and you will find decisions making themselves from honest data rather than guessing. And if you are building your site now intending AdSense approval, the logical next step is the full approval checklist before submitting — it completes what you started here.
Comments